Sunshine Garage Mk IV Roadster
The construction of a Factory Five Mk IV Roadster
Site Navigation
[Skip]
Home
Build Overview
Build Blog
Construction steps
Build Checklist
Body buck construction
Front suspension
Front disc brakes
3-link
Rear brakes
Steering rack
Fuel supply
Pedal box
Brake lines
Aluminum
Emergency brake
Footbox fresh air vents
Instrument panel
Glovebox fabrication
Cooling systems
Engine Installation
Hydraulic clutch lines
Photo Album Directory
Fasteners photo album
Body buck album
Front suspension album
Front brakes
3-link
Rear brakes
Steering rack and column
Pedal box
Fuel Tank
Brake lines
Aluminum
e-brake
Footbox vents
Electrical system
Instrument panel
Glove box
Cooling system
Engine installation
Supplemental Technical Data
AN to SAE Conversion
Brake Balance v. Deceleration
Brake System Calculations
Fasteners and fittings
Fluid Line Clamp Spacing
Links to technical information:
Tap and Clearance Drill Sizes
Tools
Road and Track (2013)
Torque specs: Factory Five
Torque specs: SAE Grade 8
Instrument panel
Dash draft layout
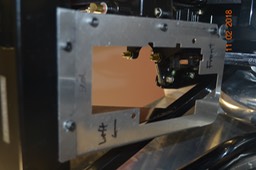
Fuse box attachment plate in test mount
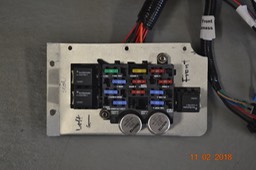
Fuse box on attachment plate
Test fit of fuse box
Gauges
Firewall grommets for rear harness and alternator
Checking harness layout
Test fit of dash
Replicar parts lower dash brace attached to dash
Rivnut for connecting lower dash brace
Attachment for lower dash brace
Test layout of gauge / switch positions
Test layout of gauge / switch positions
Pieces of angles Al for attaching dash to hoop
Positioning of dash attachment pieces
Circle cutter
Using the circle cutter: ~ 1 rps
Test fit of a gauge
Gauge holes completed
Test fit of the Classic Instrument gauges
Dash with steering wheel
Checking for wiring orientation
Rear of dash with instruments / switches installed
Front of dash with instruments / gauges installed
‘Daisy chain’ for gauge lighting
Pigtail on unused gauge wires
Another test fit of the instrument panel.
Bracket for connecting instrument panel to chassis hoop
The attachment of the instrument panel bracket.
DSC_5999
The grounding bar
Test fitting the dash attachment using the Al tabs
[Back To Top]